Mod Podge Resin is a versatile crafting medium by Plaid, designed for creating durable, glossy finishes. It’s food-safe, low-VOC, and perfect for custom projects like jewelry, coasters, and embellishments, offering a unique touch to DIY creations.
What is Mod Podge Resin?
Mod Podge Resin is a high-quality, two-part epoxy resin designed for crafting and DIY projects. It consists of a resin and a hardener that, when mixed together, create a durable, glossy finish. This product is food-safe and has low volatile organic compounds (VOCs), making it a popular choice for crafters. It’s ideal for creating custom pieces like jewelry, coasters, and decorative items. The clear formula allows for a transparent finish, and it can be enhanced with embellishments such as glitters, pigments, or inclusions. Mod Podge Resin is user-friendly, offering a unique blend of versatility and ease of use. It’s perfect for both beginners and experienced crafters looking to bring their creative ideas to life. Always ensure to follow the instructions and safety guidelines provided by Plaid to achieve the best results with this product.
Why Use Mod Podge Resin for Crafting?
Mod Podge Resin is an excellent choice for crafting due to its versatility, ease of use, and professional-quality results. It offers a clear, glossy finish that enhances your projects, making it ideal for creating decorative items like coasters, jewelry, and embellished art. The resin is food-safe and has low VOCs, ensuring it’s suitable for a variety of applications, including kitchenware and tabletop designs. Its durability and UV resistance make it perfect for long-lasting creations. Crafters appreciate its easy mixing process, with equal parts resin and hardener, and its ability to be colored or textured for unique effects. Whether you’re a beginner or an experienced maker, Mod Podge Resin provides artistic freedom and reliability, allowing you to bring your creative vision to life. With its safety features and user-friendly formula, it’s a popular choice for DIY enthusiasts looking to create beautiful, professional-looking pieces.

Safety Guidelines for Working with Mod Podge Resin
Always read the Safety Data Sheet (SDS) before use. Wear gloves, goggles, and work in a well-ventilated area. Follow instructions carefully to ensure safe handling and avoid exposure to skin or eyes.
Understanding the Safety Data Sheet (SDS)

The Safety Data Sheet (SDS) for Mod Podge Resin is a critical resource for ensuring safe handling and use of the product. Provided by Plaid on their official website, the SDS outlines detailed information about the product’s composition, potential hazards, and safety precautions. It is essential to read and understand the SDS before starting any resin project. The document includes key sections such as hazard identification, first aid measures, fire-fighting procedures, and proper handling and storage guidelines. By reviewing the SDS, crafters can familiarize themselves with the product’s properties, such as its low VOCs, and take necessary steps to minimize risks. Understanding the SDS is the first step toward a safe and successful crafting experience with Mod Podge Resin. Always refer to this document for specific instructions and safety recommendations tailored to the product.
Essential Safety Precautions
When working with Mod Podge Resin, prioritize safety to ensure a hazard-free crafting experience. Always begin by reading the Safety Data Sheet (SDS) provided on Plaid’s official website, as it outlines critical safety information. Wear protective gloves and goggles to prevent skin and eye irritation. Ensure your workspace is well-ventilated to avoid inhaling fumes, as proper ventilation is key to minimizing exposure to VOCs. Avoid direct skin contact with the resin or hardener, as it may cause allergic reactions in sensitive individuals. Use a respirator if you’re particularly sensitive to chemicals or if ventilation is inadequate. Keep the product away from children and pets, and never ingest any components. In case of spills, clean immediately with paper towels and dispose of them properly. Follow all instructions carefully to maintain safety and achieve the best results with your Mod Podge Resin projects.
Importance of Proper Ventilation
Proper ventilation is crucial when working with Mod Podge Resin to ensure a safe and healthy crafting environment. Resin and hardener release volatile organic compounds (VOCs) during mixing and curing, which can cause irritation or discomfort if inhaled. Always work in a well-ventilated area, such as near an open window or outdoors, to prevent the accumulation of fumes.
Using a fan can help circulate air, but avoid pointing it directly at the workspace to prevent dust or debris from settling on the resin. If possible, use a ventilation system or exhaust fan specifically designed for crafting. Avoid working in confined or poorly ventilated spaces, as this can lead to respiratory issues or dizziness. Even though Mod Podge Resin is labeled as low-VOC, proper airflow is essential to maintain safety and comfort during your project.
Additionally, take regular breaks and step away from the workspace to refresh your environment. This practice not only enhances safety but also helps prevent fatigue during long crafting sessions. Always prioritize ventilation to ensure a enjoyable and hazard-free experience with Mod Podge Resin.
Mixing Mod Podge Resin

Mixing Mod Podge Resin requires equal parts of resin and hardener by volume. Stir thoroughly for about two minutes until smooth and even. Mixing in small batches helps prevent bubbles in the mixture.
Measuring Resin and Hardener
Accurate measuring of Mod Podge Resin and hardener is crucial for proper curing. Always measure equal parts of resin and hardener by volume, not weight, to ensure the mixture hardens correctly. Use measuring cups specifically designed for resin to avoid contamination and ensure precision. To achieve a 1:1 ratio, pour both components into separate, clean containers before mixing. For smaller projects, consider using a digital scale to measure precise amounts, though it’s not required. Avoid overmixing, as this can introduce air bubbles. Use a stir stick to gently combine the resin and hardener until fully incorporated. Never mix more resin than needed, as it can lead to waste or curing issues. Always follow the instructions provided on the product label or the Plaid website for best results. Proper measurement ensures a smooth, durable finish for your projects.
Step-by-Step Mixing Instructions
To achieve the perfect mix for your Mod Podge Resin project, follow these steps:
- Measure Equal Parts: Always measure equal amounts of resin and hardener by volume, not weight. Use a digital scale or measuring cups for accuracy.
- Mix Thoroughly: Combine the resin and hardener in a clean, dry mixing cup. Stir slowly and steadily for about 2 minutes, ensuring no streaks remain. Avoid whipping, as this can introduce air bubbles.
- Scrape the Sides: Use a stir stick to scrape the sides and bottom of the cup to incorporate all material evenly.
- Allow to Sit: Let the mixture rest for 1-2 minutes to allow any bubbles to rise and pop naturally.
Common mistakes include incorrect ratios, under-mixing, or rushing the process. For best results, work in a well-ventilated area and refer to the Safety Data Sheet (SDS) for additional guidelines.
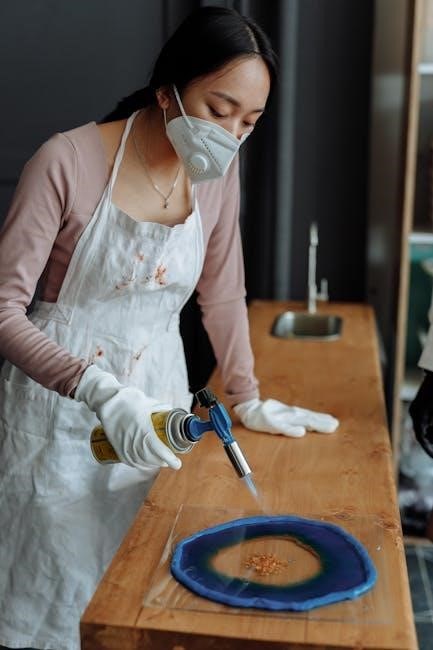
Tips for Avoiding Bubbles
When working with Mod Podge Resin, bubbles can sometimes form during the mixing or pouring process. To minimize this, ensure your workspace is at room temperature and free from drafts. Pour the resin slowly and steadily into your mold or surface to reduce air entrapment. Use a stir stick or a heat gun (on a low setting) to gently pop bubbles that rise to the surface. Additionally, lightly vibrating the surface or tapping the mold can help release trapped air. Avoid over-mixing the resin and hardener, as this can introduce excess bubbles. If using a torch, move it slowly and evenly across the surface to avoid creating new bubbles. For best results, let the mixture sit for a few minutes after mixing to allow any trapped air to escape naturally. By following these tips, you can achieve a smooth, bubble-free finish for your resin projects.
Popular Projects Using Mod Podge Resin
Mod Podge Resin is perfect for crafting unique pieces like custom jewelry, decorative coasters, and embellished home decor. Its clear, glossy finish makes it ideal for creating personalized, durable items with a professional touch.
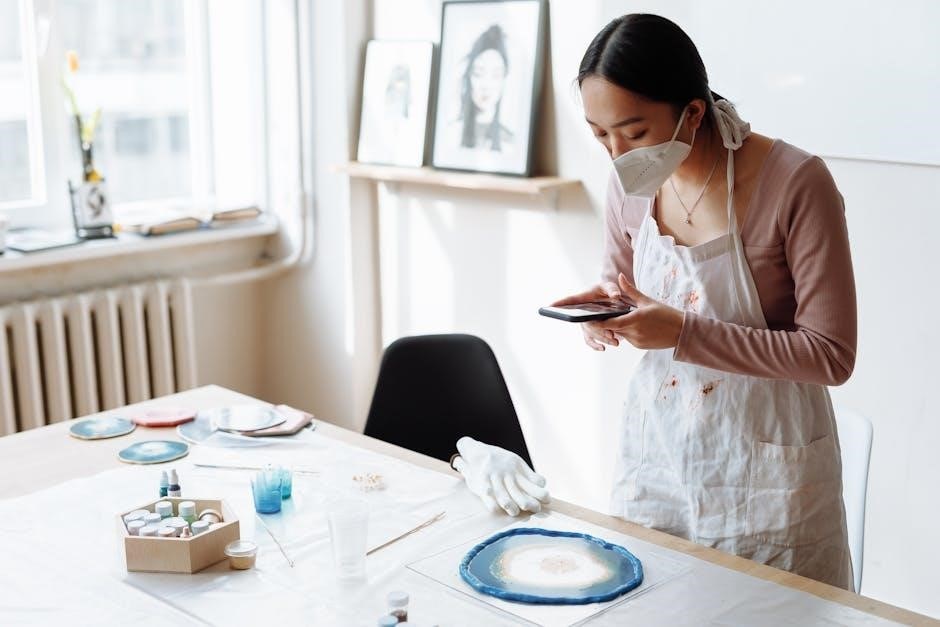
Creating Beautiful Resin Coasters
Resin coasters are a popular and creative project using Mod Podge Resin. They offer a durable, glossy finish and can be customized with various colors, glitters, and embellishments. Start by preparing silicone molds, ensuring they are clean and dry. Mix Mod Podge Resin according to instructions, adding pigments or inclusions for a personalized look. Pour the mixture into the molds, ensuring even distribution. Use a torch or heat gun to remove bubbles for a smooth finish. Allow the resin to cure fully, following the recommended time. Once cured, remove the coasters from the molds and sand the edges for a polished look. For added protection, apply a clear topcoat. These coasters are not only decorative but also heat-resistant and food-safe, making them practical for daily use. Experiment with different designs to create unique pieces that enhance your home decor or serve as thoughtful gifts.

Designing Custom Resin Jewelry
Designing custom resin jewelry with Mod Podge Resin is a fun and creative way to craft personalized accessories. This versatile medium allows you to produce unique, durable pieces with a glossy finish. To begin, select molds that match your desired jewelry design, such as pendants, earrings, or rings. Mix Mod Podge Resin and Hardener in equal parts, ensuring proper measuring for a smooth cure. Add color with pigments or inclusions like glitter or beads for a personalized touch. Pour the mixture into the mold and let it cure fully. Once cured, remove the jewelry from the mold and sand any rough edges for a polished finish. Resin jewelry is lightweight, waterproof, and long-lasting, making it ideal for everyday wear. With Mod Podge Resin, you can experiment with countless designs, from minimalist to elaborate, creating one-of-a-kind pieces that reflect your style.
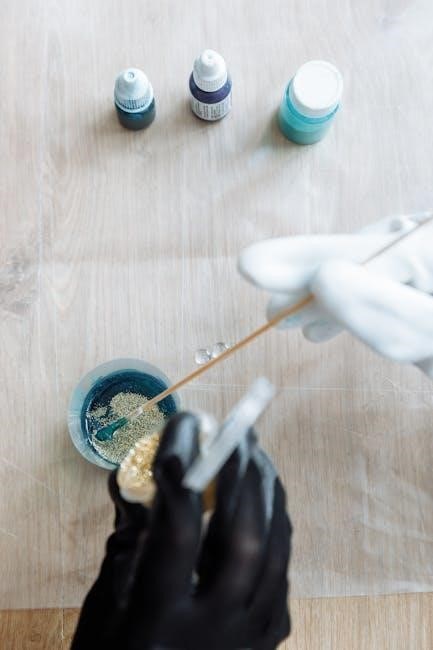
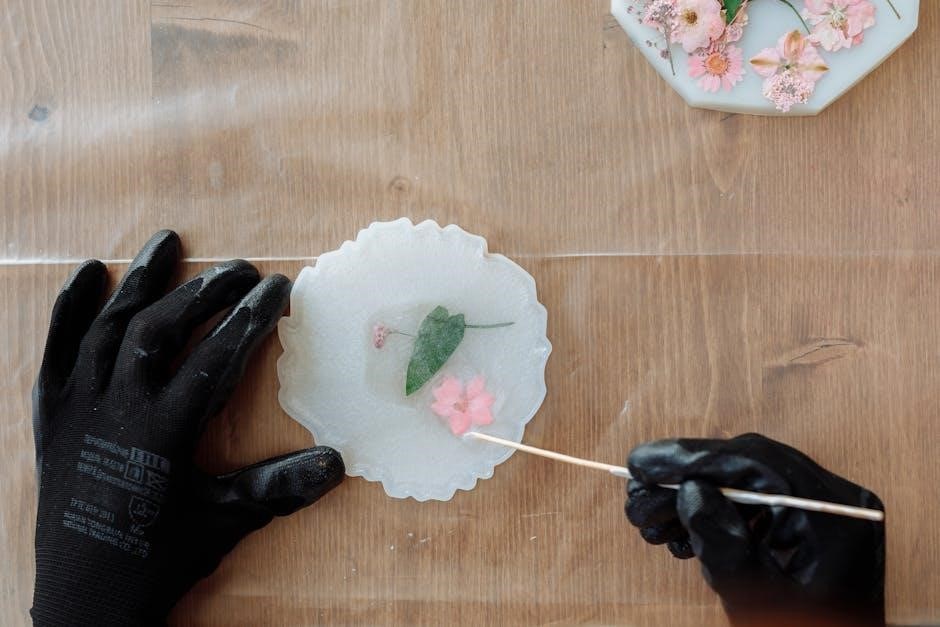
Adding Embellishments to Resin Pieces
Enhance your Mod Podge Resin projects by incorporating embellishments for a unique, personalized touch. Glitter, beads, pigments, or small decorative items can be added to the resin mixture before pouring it into molds. For best results, mix these elements gently to avoid air bubbles. Timing is key—add embellishments after mixing the resin and hardener but before the mixture starts to cure. Use a toothpick or small tool to position delicate items precisely. Ensure the resin is not too runny, as this will help hold the embellishments in place. Once set, the clear, glossy finish will showcase your designs beautifully. This technique allows for endless creativity, making each piece truly one-of-a-kind. Always follow safety guidelines and work in a well-ventilated area when adding embellishments to your resin creations.
Tools and Materials Needed
Essential tools for Mod Podge Resin projects include mixing cups, stir sticks, and measuring tools. Protective gear like gloves and goggles is crucial. Use wax paper or a silicone mat for surfaces. A heat gun helps remove bubbles, and clamps or molds hold pieces in place.
Essential Tools for Resin Projects
When working with Mod Podge Resin, having the right tools ensures a smooth and successful crafting experience. A mixing stick or stirrer is crucial for blending resin and hardener evenly, preventing air bubbles. Measuring cups with clear markings help accurately measure equal parts of resin and hardener by volume. A heat gun or torch is handy for popping bubbles that rise to the surface during pouring. Gloves and goggles are vital for protecting skin and eyes from potential spills or splashes. A well-ventilated workspace, such as a craft mat or disposable surface, is essential for maintaining cleanliness and safety. Optional tools like molds, Pigment Powders, or Glitter can enhance creativity and customization. For curing, a flat surface or clamps may be needed to hold pieces steady. Always refer to Plaid’s official guide for specific recommendations tailored to your project. These tools will help you achieve professional-looking results and make your resin crafting journey enjoyable and efficient; Proper preparation ensures a flawless finish for your unique creations.
Recommended Materials for Best Results
To achieve the best results with Mod Podge Resin, gather the following essential materials:
- Measuring Cups and Stir Sticks: Accurate measurements are critical. Use clean, dry measuring cups and sturdy stir sticks for mixing resin and hardener.
- Digital Scale: For precise mixing ratios, especially for larger projects, a digital scale ensures accuracy.
- Mixing Surface: A heat-resistant surface, like a silicone mat or parchment paper, protects your workspace from spills.
- Molds: Use silicone molds for intricate designs or disposable containers for simpler shapes. Ensure molds are clean and dry.
- Embellishments: Add color or texture with pigments, glitter, or small decorative items. Mix well before pouring into molds.
- Curing Tools: A UV torch or heat gun can help remove bubbles and ensure proper curing. Follow instructions for curing times.
- Clean-up Supplies: Keep paper towels and a lint-free cloth handy to manage spills and wipe tools.
- Protective Gear: Wear gloves and goggles to protect against skin and eye irritation during mixing and handling.
Having these materials ready ensures a smooth and successful crafting experience with Mod Podge Resin.
Troubleshooting Common Issues
Common issues with Mod Podge Resin include uneven mixing, bubbles, or incomplete curing. Ensure accurate measurements, use a torch to remove bubbles, and verify hardener ratios for proper curing. Address surface imperfections with light sanding and a fresh coat.
Resolving Mixing Issues
Ensuring proper mixing of Mod Podge Resin is crucial for successful projects. If the resin and hardener are not mixed accurately, it can lead to issues like a sticky surface or soft spots. Always measure equal parts of resin and hardener by volume, using a digital scale for precision. If you notice uneven mixing, gently stir the mixture again without introducing air bubbles. Avoid under-mixing, as this can prevent the resin from curing properly. If you accidentally add too much hardener or resin, remixing a small batch to balance the ratio may help. Additionally, working in a well-ventilated, room-temperature environment ensures the mixture cures correctly. If bubbles form, use a torch or heat gun to gently pop them. Remember, patience is key—mix slowly and thoroughly to achieve a smooth, even consistency. Proper mixing is the foundation of a successful resin project, so take your time to get it right. This step sets the stage for a professional-looking finish.
Fixing Curing Problems
When working with Mod Podge Resin, curing issues can arise due to improper mixing, temperature fluctuations, or environmental factors. If the resin remains sticky or doesn’t harden fully, check the mix ratio and ensure equal parts of resin and hardener were used. Verify the room temperature is between 70-75°F, as cooler or warmer conditions can slow curing. Humidity can also delay the process, so work in a dry, well-ventilated area. If bubbles form, gently heat the surface with a hairdryer or heat gun to help them rise and pop. For uneven curing, lightly sand the area and apply a fresh, thin coat of resin. Allow the recommended curing time of 24 hours before handling or using the piece. Proper preparation and patience are key to achieving a smooth, professional finish in your resin projects.
Addressing Surface Blemishes

Surface blemishes, such as dust, bubbles, or uneven finishes, can occasionally appear when working with Mod Podge Resin. To address these issues, start by ensuring your workspace is clean and free from debris. For small bubbles, gently use a torch or heat gun to pop them before the resin cures. If blemishes appear after curing, lightly sand the surface with fine-grit sandpaper and wipe away dust with a lint-free cloth. For deeper imperfections, apply a thin additional coat of resin and allow it to cure fully. Proper mixing and a dust-free environment are key to preventing these issues. Always wear gloves and work in a well-ventilated area when sanding or applying additional coats. By taking these steps, you can achieve a smooth, professional finish for your resin projects.
Mod Podge Resin offers endless creative possibilities with its food-safe, low-VOC formula. Follow safety guidelines, measure accurately, and embrace experimentation. With proper techniques, you’ll achieve professional-looking results, making every project a satisfying and durable masterpiece.
Final Tips for Successful Resin Crafting
For a flawless resin crafting experience, always follow the instructions carefully and ensure proper preparation. Patience is key, as curing times may vary based on environmental conditions. Work in a well-ventilated area to avoid inhaling fumes and maintain a clean workspace to prevent contamination. Lightly sand surfaces before applying resin for better adhesion. Use a heat gun or torch to eliminate bubbles, but avoid overheating the resin. Mix resin and hardener precisely, adhering to the 1:1 ratio, and stir thoroughly for full chemical activation. Avoid over-mixing, as it can introduce air bubbles. Apply thin layers, allowing each to cure before adding more, to prevent uneven finishes. For intricate designs, use molds to achieve precise shapes. Add pigments or embellishments sparingly to maintain clarity. Clean tools immediately with isopropyl alcohol to prevent resin from hardening on them. Finally, consult the SDS and safety guidelines for handling and disposal. By following these tips, you’ll achieve professional-looking results and enjoy a rewarding resin crafting journey.